How to Stretch Canvas for Painting
Share
Stretching canvas for painting is a fundamental skill that every artist should master. The process of preparing a canvas for painting is not only crucial for the longevity of the artwork but also for the overall aesthetics of the finished piece.
From selecting the right materials to achieving the perfect tension, there are numerous factors to consider when stretching canvas. Understanding these techniques can elevate the quality of your paintings and provide a solid foundation for your artistic endeavors.
Key Takeaways
- Select appropriate materials such as stretcher bars, unprimed cotton canvas, and high-quality tools for stretching canvas.
- Follow proper steps to assemble the stretcher frame, ensuring the bars are aligned, corners are secure, and the frame is straight.
- Stretch and staple the canvas tightly onto the frame, starting from the center of each side and using canvas pliers to achieve even tension and neat corners.
- Attach and tighten the canvas to the bars, folding the edges over and securing them with staples or tacks, and use canvas pliers to stretch the canvas tightly. Finally, prime the stretched canvas with gesso for a suitable painting surface.
Selecting the Right Materials
Selecting suitable stretcher bars for the canvas size is crucial for ensuring a customizable and secure foundation for the painting.
When considering the right materials for stretching canvas, it is essential to choose stretcher bars that are appropriate for the intended canvas size. This allows for customization of dimensions and materials, catering to the specific needs of the artwork.
Additionally, the choice of canvas material is paramount. Opting for unprimed cotton canvas provides ease when stretching and enables artists to personalize the primer according to their preferences.
Investing in high-quality stretcher bars, canvas pliers, and heavy-duty staples, coupled with a staple gun, ensures a secure attachment and eliminates the possibility of wrinkles, resulting in a taut and smooth canvas surface.
Furthermore, proper priming of the canvas with a primer of your choice is imperative for creating a stable and smooth painting surface. These materials can often be found at art supply stores, and with the right tools, artists have the option to stretch their own canvas or seek a professional canvas stretching service for assistance.
Using a utility knife for trimming excess canvas after stretching ensures a neat and professional finish.
Assembling the Stretcher Frame
To assemble the stretcher frame, begin by aligning the stretcher bars to form a rectangle and then carefully secure the corners with gentle fitting and tapping if necessary.
Using a right angle can ensure that the frame is straight before fitting and screwing the crossbars into place.
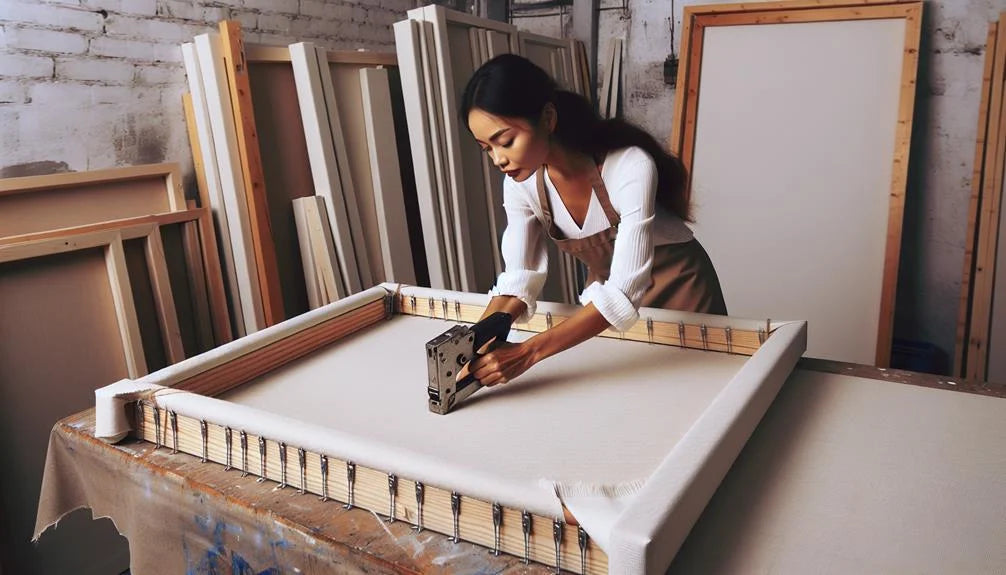
When stretching the canvas, roll it out and measure, leaving extra fabric on all sides, before stapling it to the bars, starting from the center of each side and working outwards.
To ensure the canvas is taut, use canvas pliers to pull the fabric tight, paying attention to neatly folding the corners.
It is important to take your time to practice and be patient, aiming for a wrinkle-free and tight canvas, ensuring a smooth painting surface.
Additionally, use a rubber mallet to gently tap the frame on the canvas, maintaining tension as you staple the sides.
This methodical approach will result in a neatly stretched canvas, ready for your artistic endeavors.
Stretching and Stapling the Canvas
When stretching your canvas, use a heavy-duty staple gun to secure the primed canvas onto the wood bars.
Start by measuring and cutting the canvas, leaving extra fabric on all sides to ensure complete coverage.
Begin stapling from the center of each side and work outwards, maintaining even tension as you go.
Utilize canvas pliers to pull the fabric tight, ensuring a smooth and taut painting surface.
Pay close attention to the corners, neatly folding the canvas and securing it with staples.
Pound all staples with a hammer to ensure they are flush with the frame, adding extra staples if necessary for security.
Assemble the frame carefully, ensuring it is straight and using a right angle to fit the corners.
Start with smaller canvases to gain confidence before moving on to larger ones, and consider gessoing the canvas for a smoother painting surface, particularly when using oil paint.
Periodically inspect the stretched canvases for any signs of damage or loosening to maintain a high-quality painting surface.
Attaching and Tightening the Canvas
Attaching and tightening the canvas involves carefully positioning the stretched bars on the canvas and securing the edges with staples or tacks before using canvas pliers to achieve a taut and smooth surface.
When attaching the canvas, it is crucial to ensure that the canvas is stretched evenly to avoid any distortions in the final artwork. Lay the canvas face down on a clean and flat surface. Position the stretcher bars on top of the canvas, making sure to align the corners properly. Then, fold the edges of the canvas over the stretcher bars and secure them with staples or tacks.
After this initial attachment, canvas pliers are essential for stretching the canvas tightly over the bars. By gripping the canvas with the pliers, it can be pulled firmly to achieve the desired tension. The canvas needs to be secured to the bars by stapling or tacking along the edges.
Take care to ensure that the canvas is stretched evenly on all sides, and any excess canvas can be trimmed after stretching to achieve a smooth and taut surface.
Priming the Stretched Canvas
After achieving a taut and smooth surface by carefully attaching and tightening the canvas, the next step in the canvas preparation process is priming the stretched canvas to create a smooth and stable painting surface with gesso.
- Application of Gesso: Use a brush or roller to evenly coat the stretched canvas with gesso, ensuring complete coverage to create a suitable painting surface.
- Drying Time: Allow the gesso to dry completely before applying any paint. This ensures a stable and absorbent ground for the subsequent layers of paint.
- Multiple Coats: Apply multiple coats of gesso for a more refined surface. Each coat should be allowed to dry completely before applying the next layer.
- Finishing Touches: Lightly sand the primed canvas to achieve a smoother finish, which will enhance the overall painting experience and result in a professional-looking artwork.
Frequently Asked Questions
How Do You Stretch a Canvas for Beginners?
Canvas preparation for beginners involves mastering stretching techniques, tension control, corner folding, and staple placement. Material selection, surface priming, frame assembly, canvas maintenance, and size adjustment are crucial for a professional finish.
Can You Stretch a Canvas Painting Yourself?
Yes, you can achieve professional results by stretching a canvas painting yourself through DIY stretching techniques. With proper canvas preparation, tension, and framing, along with the right supplies and following expert tips, mastering canvas stretching is achievable.
Should You Stretch Canvas Wet or Dry?
When deciding whether to stretch canvas wet or dry, consider the material choice, tension control, and frame selection. Wet stretching yields a smoother surface but requires precision, while dry stretching allows for adjustments and is recommended for beginners.
Do You Paint Before or After Stretching Canvas?
Painting before stretching canvas offers more control over the surface tension and allows for artistic expression. Canvas preparation, painting techniques, and surface manipulation are crucial in the artistic process. This method enhances art creation and canvas maintenance.
Conclusion
In conclusion, the process of stretching canvas for painting requires careful attention to detail and precision.
By selecting the right materials, artists can ensure a smooth and taut surface for their artwork.
Assembling the stretcher frame is an important step in the process.
Stretching and stapling the canvas is another crucial step.
Lastly, priming the stretched canvas prepares it for painting.
Following these steps will result in a professional and durable canvas that is ready for painting.


